


Headlights are an essential component of your vehicle's safety features. Over time, they can become dull, cloudy, and less effective due to oxidation, impacting both the aesthetics of your car and your safety while driving at night. To address these issues, headlight restoration is a cost-effective solution. In this detailed guide, we'll explore everything you need to know about headlight restoration.
What is Headlight Restoration?
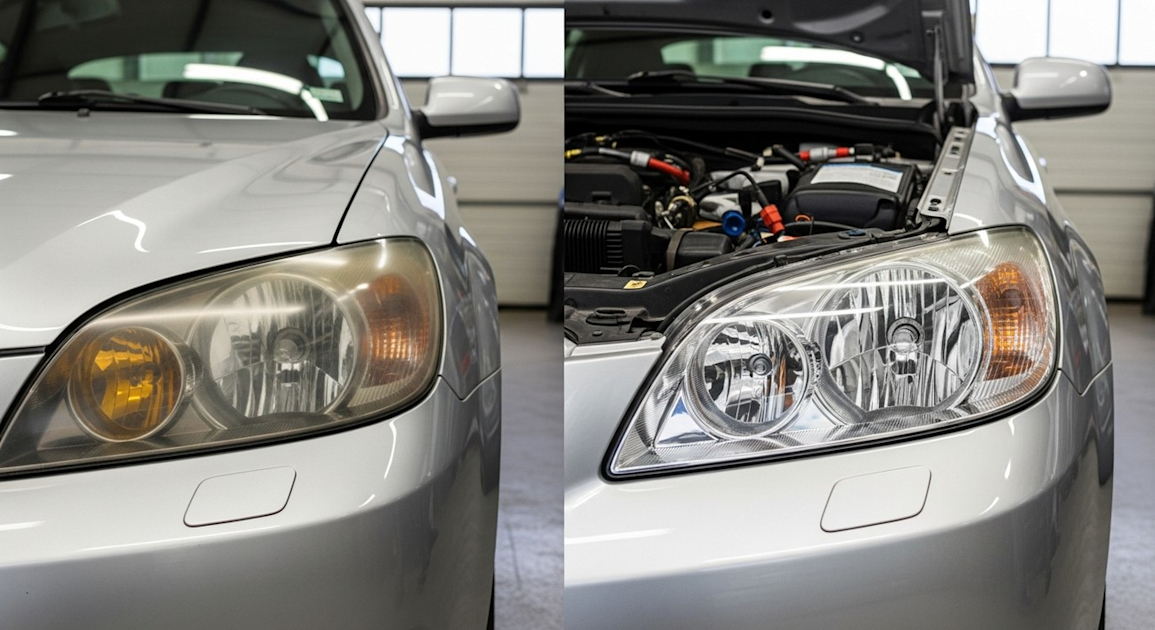
Headlight restoration is the process of cleaning, sanding, and polishing the lenses of automotive headlights. It restores the clarity and effectiveness of headlights, improving both vehicle safety and appearance.
Why Do Headlights Get Cloudy?
Headlights become cloudy primarily due to the effects of environmental factors and oxidation. Here's a closer look at the main causes:
- UV Radiation: Exposes headlights to ultraviolet radiation from the sun, which breaks down the outer layer of the plastic lens.
- Road Debris and Chemicals: Dust, sand, and rocks scrape against headlights, while road salt and other chemicals can accelerate wear.
- Moisture: Condensation inside headlight housings can lead to cloudiness.
- Oxidation: Over time, exposure to oxygen causes the plastic to oxidize, leading to that foggy appearance.
Benefits of Headlight Restoration
Restoring your headlights has several noteworthy benefits:
- Improved Visibility: Clearer headlights allow more light to penetrate through, giving you better visibility at night.
- Enhanced Safety: Better illumination makes your driving safer by enabling you to see and be seen more effectively.
- Aesthetic Appeal: Restored headlights improve the look of your car, making it appear newer and more well-maintained.
- Cost Savings: Restoring headlights is significantly cheaper than buying new ones.
Tools and Materials Needed
Restoring your headlights requires specific tools and materials. Here's what you'll need:
- Sandpaper or Sanding Pads: Various grits from 400 to 3000 are typically recommended.
- Polishing Compound: A high-quality compound for polishing the surface.
- UV Sealant: This helps to protect the headlights from future UV damage.
- Masking Tape: To protect the surrounding areas of your car.
- Microfiber Cloths: For application and cleaning during the restoration process.
- Spray Bottle with Water: Used while sanding to help reduce dust and friction.
DIY Headlight Restoration Steps
Here's a step-by-step guide to restoring your headlights yourself.
Preparation
- Gather Tools: Assemble all necessary tools and materials before you start the process.
- Safety First: Wear gloves and eye protection to prevent injuries and avoid skin contact with chemicals.
- Tape the Edges: Use masking tape to protect your car's paint around the headlights.
Cleaning
- Wash the Headlights: Start by thoroughly washing the headlights with soap and water.
- Dry Completely: Ensure they are completely dry before starting the restoration process.
Sanding
- Start with Coarser Grit: Use the 400-grit sandpaper to gently sand the surface, keeping it wet with a spray bottle.
- Switch to Finer Grits: Progress to 600, 1200, and finish with 3000 grit, ensuring the surface is smooth and clear.
- Rinse and Dry: After sanding, rinse the headlights and let them dry completely.
Polishing
- Apply Polishing Compound: Use a microfiber cloth to apply the polishing compound, rubbing in a circular motion.
- Buffing: Buff the headlight surface with the cloth or an electric buffer until it's clear and shiny.
Sealing
- Apply UV Sealant: After polishing, use a clean cloth to apply a UV sealant. This is crucial to protect against further sun damage.
Professional Headlight Restoration Services
When to Seek Professional Help
While DIY restoration is effective, there are times when professional services might be necessary:
- Severe Damage: If the headlights are severely damaged or pitted.
- Time Constraints: For those who lack time or prefer not to handle chemical products themselves.
What to Expect
Professional services have the following advantages:
- Advanced Techniques: They may use specialized equipment and proprietary products.
- Warranty Offerings: Many services come with warranty offers on their work.
- Convenient Options: Mobile services may be available, bringing the restoration to your location.
Maintenance Tips for Restored Headlights
To prolong the life of your restored headlights, follow these maintenance tips:
- Regular Cleaning: Wipe your headlights with mild soap and water regularly.
- UV Protection: Apply a UV protectant monthly.
- Avoid Abrasives: Use only non-abrasive cleaning agents to prevent damage.

Headlight Restoration FAQ
Why should I consider headlight restoration?
Headlight restoration is crucial for maintaining optimal visibility while driving, especially at night. Over time, headlights can become cloudy and yellowed due to exposure to UV rays, road debris, and harsh weather conditions. Restoring them can significantly improve the clarity of your headlights, ensuring that your vehicle's light output is not hindered. This not only enhances safety by improving your ability to see the road but also improves the overall appearance of your vehicle, which may potentially increase its resale value.
How does headlight restoration work?
Headlight restoration involves several steps aimed at removing the outer layer of damage and polishing the underlying surface. Typically, this process starts with cleaning the headlights, followed by sanding away the oxidized layers and any remaining debris. Once this is complete, a polishing compound is applied to restore the shine and clarity of the headlights. In some cases, a protective sealant is also added to prevent future yellowing and oxidation. This process can often be done using a headlight restoration kit or by seeking professional services.
How often should I restore my headlights?
The frequency of headlight restoration depends on several factors, including driving conditions, exposure to sunlight, and environmental factors. On average, headlights may need restoration every 12 to 24 months. However, if you frequently drive in harsh weather or on rough roads, you might need to restore your headlights more often. Regular inspections can help identify when it’s time for another restoration, ensuring your headlights remain clear and effective.
Can I perform headlight restoration myself?
Yes, headlight restoration is a task many car owners can perform themselves with the right tools and materials. There are numerous DIY headlight restoration kits available on the market that come with detailed instructions. These kits often include sandpaper, polishing compounds, and sometimes protective coatings. However, if you're not comfortable doing it yourself or if the damage is extensive, you may want to consider professional headlight restoration services to ensure optimal results.
What are the signs that my headlights need restoration?
You may notice several signs indicating the need for headlight restoration. Common indicators include a yellowish or cloudy appearance on the headlight lens, scratches or foggy patches, and reduced light output when driving at night. If you find that your headlights are less effective than they once were or if you struggle with visibility during nighttime driving, it’s time to consider restoring them. Regularly inspecting your headlights can help catch these signs early.
Are there professional headlight restoration services?
Yes, besides DIY headlight restoration kits, professional headlight restoration services are available. Automotive repair shops and detailing services often provide these services and are equipped to handle any level of damage. Professional restoration tends to offer a more thorough cleaning, polishing, and sometimes involves applying a UV-resistant coating. This is particularly beneficial if your headlights are severely oxidized or if you want a durable, long-lasting finish.
What materials are needed for DIY headlight restoration?
For a DIY headlight restoration, you'll need a few key materials. A standard kit typically includes different grits of wet or dry sanding sheets, a polishing compound, microfiber towels, masking tape to protect surrounding areas, and a UV-protective sealant. If you purchase a headlight restoration kit, it will likely provide all the necessary components. However, if you're assembling your own supplies, ensure you have all the necessary materials to achieve a professional-looking finish.
Will headlight restoration fix scratches on the lenses?
Yes, headlight restoration can often fix or significantly reduce the appearance of minor scratches on the headlight lenses. During the sanding process, the outer damaged layer of the lens is gradually removed, which can help even out the surface and diminish scratches. Polishing further smooths the treated surface and enhances clarity. However, if your headlights have deep scratches, complete removal through restoration might not be possible. In such cases, replacing the lens may be the best option.
Is headlight restoration permanent?
No, headlight restoration is not a permanent solution. Over time, exposure to UV rays, dirt, and weather conditions will again degrade the headlight lenses. However, applying a UV protective sealant during the restoration process can extend the clarity of headlights and delay the return of yellowing and cloudiness. Regular maintenance and avoiding prolonged exposure to direct sunlight can help prolong the effects of restoration.
Is there a difference in the outcome between DIY and professional headlight restoration?
Yes, there can be a difference between DIY and professional headlight restoration. DIY kits can provide satisfactory results, especially if you follow the instructions closely and have moderate skill with car maintenance. However, professionals have access to specialized equipment and more robust materials, often yielding a more polished result. Professionals also have experience dealing with various types of headlight materials and damage levels, which can contribute to a more durable and aesthetically pleasing finish.
Step-by-Step Guide for Headlight Restoration
Tools/Materials Needed
- Masking tape
- Car soap or mild dish soap
- Microfiber cloths
- Sandpaper (various grits: 600, 800, 1000, 2000, 3000)
- Spray bottle with water
- Headlight restoration kit (optional, but can include polish and UV sealant)
- Plastic polish or rubbing compound
- UV sealant or protective coating
- Safety goggles and gloves
Preparation Steps
- Park Safely: Ensure the car is parked on a flat surface and the ignition is turned off. Allow the headlights to cool if they were recently used.
- Clean the Headlights: Start by washing the headlights with car soap and water to remove any surface dirt or grime. Use a microfiber cloth for a thorough clean.
- Protect the Surrounding Area: Use masking tape to cover the areas around the headlights. This precaution prevents any accidental scratches or damage to your car's paintwork during the restoration process.
Detailed Instructions
Wet Sanding - First Pass:
- Begin with the coarsest sandpaper (600 grit). Dip it in a bowl of water or use a spray bottle to keep the surface lubricated. Wet sanding is crucial to remove the oxidized layer effectively.
- Using a consistent back-and-forth motion, sand the headlight gently and evenly. Avoid applying too much pressure, as you might scratch the lens permanently.
Continue Wet Sanding:
- Gradually move to finer grits – progress to 800, 1000, and then 2000 grit sandpaper, ensuring the surface remains wet throughout the process.
- Each subsequent sandpaper should further smoothen the headlight surface, so keep your movements steady and even.
Final Wet Sanding:
- Finish with the finest grit paper (3000). This step ensures the headlights are smooth and prepares them for polishing.
- Rinse off the headlights with clean water and wipe them dry with a microfiber cloth.
Polishing:
- Apply a small amount of plastic polish or rubbing compound onto a clean microfiber cloth. You can also use a headlight restoration kit that includes the appropriate polish.
- Rub the polish onto the headlight in a circular motion until you see a noticeable improvement in clarity. Depending on the condition of the headlights, repeat this step as necessary.
Apply UV Sealant:
- Once satisfied with the clarity, it’s crucial to protect the headlights from future damage. Apply a UV sealant or protective coating according to the manufacturer's instructions.
- Allow the sealant to dry and cure as directed. This step helps prevent the yellowing and fogging from occurring again.
Tips for Success
- Take Your Time: Rushing can lead to uneven sanding or damage. Allow enough time to work through each step meticulously.
- Keep It Wet: Ensure your sanding process stays wet. This helps in smoother sanding and prevents scratches.
- Repeat If Necessary: Depending on the initial condition of the headlights, you may need to go through these steps more than once to achieve the desired clarity.
What to Do If Something Goes Wrong
- Persistent Fogging/Yellowness: If the lenses still appear foggy or yellowed after following these steps, try repeating the sanding and polishing process. More severe oxidation may require additional passes.
- Scratches or Damage: If deep scratches occur, start again with the coarser sandpaper (600 grit) and work back up. Ensure you're sanding evenly and keeping the surface wet.
- Peeling or Flaking Coating: If the protective coating starts to peel, remove it completely with a fine grit sandpaper before reapplying a new coat.

Final Thoughts
Restoring your headlights is not just about aesthetics; it's crucial for your safety on the road. Over time, headlights can become foggy or discolored, significantly reducing your visibility and making it harder for others to see you. With a bit of care and the right approach, headlight restoration can bring back that clear shine, ensuring you drive confidently, especially along the scenic roads here in Roseville, CA.
If you’re looking to improve your vehicle's lighting and enhance its overall appearance, we’re here to help. At A+ Window Tinting, we specialize in headlight restoration, and we’d love to discuss how we can assist you. Feel free to reach out to us for a consultation or to request a free estimate. Your safety is our priority, and we want to ensure your vehicle looks and performs its best.


